%20to%20Make%20Logins%20Easy%20(1).png)
What Is Single Sign-On (SSO)?
Single sign-on (SSO) is a feature allowing users to use one set of login credentials to access multiple applications or services without needing to create a separate account.
With SSO in Freshservice, users can log in to the Freshservice platform using their existing credentials from a provider like Google or Microsoft.
Instead of having to remember and enter usernames and passwords for each service/app separately, this makes it easier and faster for users to access different apps within the Freshservice platform, ultimately simplifying user management for IT administrators while enhancing security by reducing the risk of password-based attacks.
Top 8 Benefits – Using SSO in Freshservice
- Enhanced Security: Use one set of login credentials to access multiple apps/services, lowering the risk of password-related security breaches.
- Increased Productivity: Eliminate the need for users to repeatedly create, remember, and enter login credentials for different services.
- Improved User Experience: Streamline the login process and make it easier and faster for users to access services and apps.
- Simplified User Management: Reduce the need to create and manage multiple accounts for each user.
- Compliance: More easily meet compliance requirements by providing a secure and auditable way to manage user access to services.
- Centralized Access Control: Provide centralized access control for multiple services, allowing Freshservice admins to manage user access to different services from a single dashboard.
Freshservice Tips and Tricks to Always Remember
- Tip: We recommend testing the SSO integration before rolling it out to all users.
- Tip: Before you configure, have on hand the necessary information, such as security certificate and service provider ID.
- Tip: Freshservice allows the ability to set up separate or alike settings for agents/employees and contacts.
- Tip: Even after setting up SSO, multiple log in methods are still available at the same time.
- Tip: Log in methods can be applied to specific accounts if needed.
How to Make Logins Easy with SSO in Freshservice
To set up SSO in Freshservice, follow these steps:
1. Log in to your Freshservice account with administrator privileges.
2. Navigate to the Admin settings.
3. Under "Service Desk Security", click on "Modify Log In Policy" button.
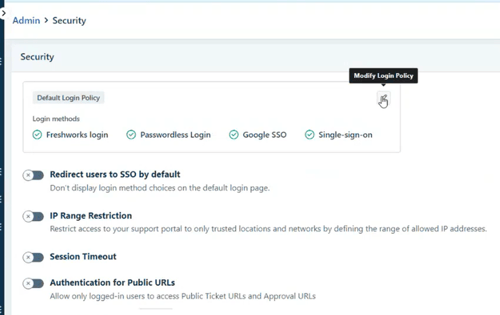
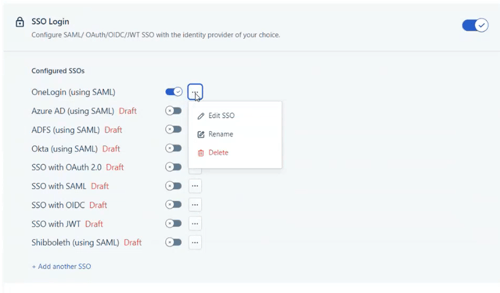
4. Select your Identity Provider from the list of available providers. Freshservice supports a variety of identity providers, including Google, Microsoft, Okta, OneLogin, and others. Choose one or more options that you want to use for your organization.
5. Configure the SSO settings for your chosen Identity Provider. The configuration process may vary depending on your Identity Provider. Here are some general steps to follow:
A. Obtain the necessary details and values from the Identity Provider, which may include a SAML endpoint URL, entity ID, and X.509 certificate.
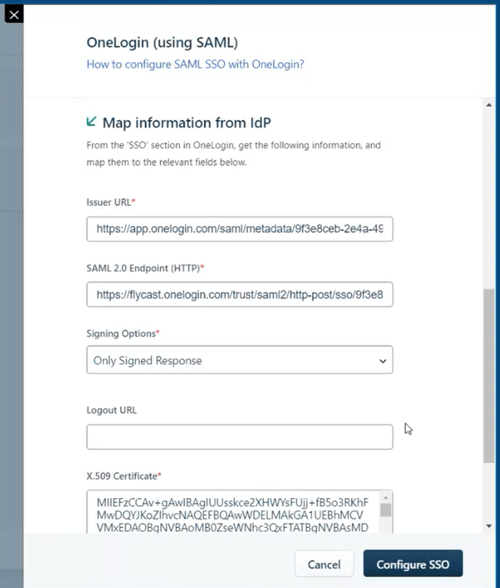
B. Enter the values in the corresponding fields in Freshservice's SSO settings.
C. Enable the SSO feature in your Identity Provider and enter the SSO URL provided by Freshservice.
6. Once completing the configuration, click on "Save" to save the settings.
7. Users can now access Freshservice by logging in through the chosen Identity Provider.
Note: The exact steps for setting up SSO in Freshservice may vary depending on your specific Identity Provider and configuration requirements.
For more Freshservice Tips and Tricks videos, click here.

For more information about our Freshservice Professional Services, click here.
