
What Is a Field ID?
In Freshservice, a field refers to a specific piece of information that is collected or displayed for a ticket. For example, the "Subject” and "Description" fields are standard ticket fields in Freshservice. Each field in Freshservice is assigned a unique identification number called a Field ID. This number is used to identify and reference specific fields within the Freshservice system, allowing the agent to interact with or modify the specific field.
Why Are Field IDs Important?
Field IDs are required when using Freshservice's API for programmatic access to the service desk data, or when creating customizations within the portal, such as adding or modifying fields on the ticket form to meet organizational needs.
Knowing the ID for a particular field can be useful when integrating Freshservice with other tools or services. It enables accurate targeting of specific fields within the service desk data, ultimately ensuring seamless data sharing and integration across the enterprise.
Today’s Freshservice Tip will help you locate the unique identification number assigned to a specific field.
We recommend this advanced technique to Freshservice admins who are familiar with APIs and want to take their skills to the next level.
Top 10 Benefits – Finding Field IDs
- Customization: Meet your specific needs by creating custom ticket fields, business rules, or reports
- Automation: Automate support workflows, saving time and improving efficiency
- Reporting: Generate detailed reports that provide insights into support operations
- Integration: Share data between Freshservice and other tools, streamlining workflows
- Consistency: Ensure the use of correct data and reduce the risk of errors in configuration settings and code
- Flexibility: Easily modify support processes and workflows as business needs change
- Efficiency: Quickly and easily locate specific data to make informed decisions and take action
- Accuracy: Ensure the pulling of correct data from Freshservice, improving the accuracy of reports and business processes
- Clarity: Enable others to understand and modify documentation and code comments
- Scalability: Manage increasing amounts of data and maintain consistency across operations
Top 5 Common Scenarios for Finding Field IDs
- Creating custom ticket fields: This Field ID can then be used to reference the custom field in other parts of the Portal or in any third-party apps that may be used.
- Configuring Workflow Automations: If you are utilizing an external scripting language to work with external integrations (i.e., PowerShell), the system can retrieve information from the field with a web request.
- Creating custom reports: To create custom reports that include data from specific ticket fields, the Field IDs of those fields help ensure the correct information is referenced in the report query.
- Integrating with third-party apps: When using third-party apps that integrate with Freshservice, Field IDs may need to be referenced in the app's configuration settings.
- Creating custom webhooks: To create custom webhooks that trigger based on specific ticket events, Field IDs needs to be referenced in the webhook configuration to capture the relevant data.
Freshservice Tips and Tricks to Always Remember
- Tip: This is an advanced tip and recommended for Freshservice admins who are familiar with APIs.
- Tip: Please keep in mind that the name of the field may be different depending on the method you use to pull the data. For example, “type fields” on assets is called “level fields” using the .JSON method.
- Tip: When utilizing the API, it is necessary to have the internal ID (record ID) while some methods may require the display ID.
How to Find the Field ID – Three Ways - Using .JSON, Web Elements, and API
There are three ways to find Field IDs:
- Adding .JSON to the URL of the object in the agent view
- Inspecting the web elements of the portal page
- Using the API to find item fields
How to Add .JSON to the URL of the Object in the Agent View
- Open the Service Catalog administration module.
- Select the Item you need to view.
- Add .JSON to the item number in the URL.
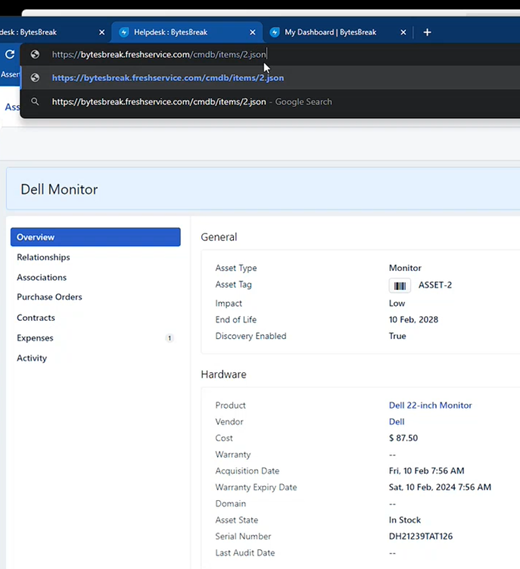
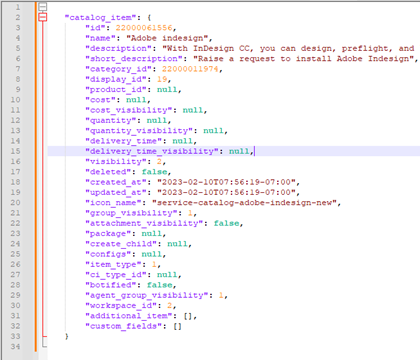
- This action will display JSON script of the service catalog item.

- Use an application like Notepad++ to format the JSON into a more readable format
- If you want to edit the item, go to the URL. At the end of the URL, remove “edit” and replace it with “.JSON”.
- This will give you full text representation of the object, similar to Step 3 from above.
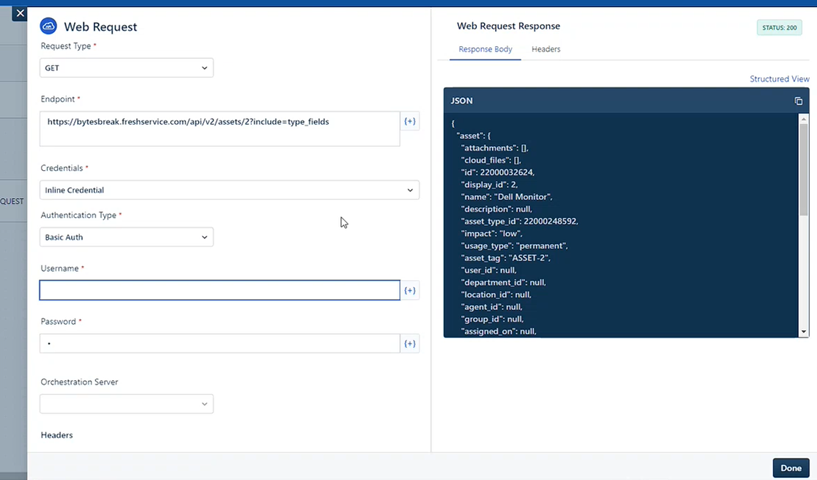
- Within Freshservice, you can also see the field ID by using a Web Request. Type in the endpoint and be sure to include the “type field” to retrieve the product information. When you press “Test Web Request,” it comes back with the formatted .JSON information. Keep in mind that the name of the field may be different depending on the method you use to pull the data.
How to Inspect the Web Elements of the Portal Page
- Log in to your Freshservice account as an agent.
- Go to the ticket form where the field is located.
- Right-click on the field and select "Inspect" or "Inspect Element" (depending on your browser).
- This will open the browser's developer tools. Locate the HTML code for the field, which should be highlighted in the "Elements" or "Inspector" tab.

- Look for the data-field-id attribute in the HTML code. The value of this attribute is the field ID.

How to Use the API to Find Item Fields
- Use Postman, Python, PowerShell, or your favorite language.
- Reference the API documentation at https://api.freshservice.com/v2/#introduction to find the endpoint of the item you need.
- You will need to understand how to setup authentication.
- Run a GET for find the field information.
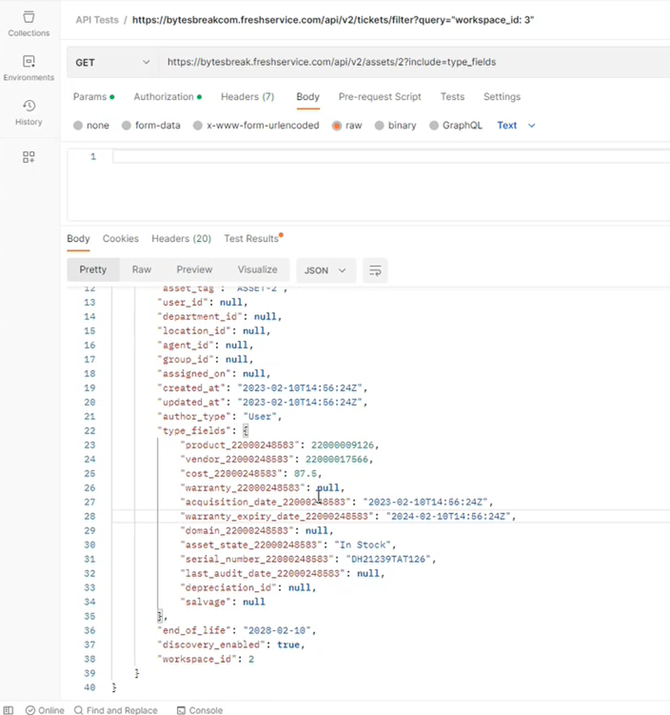
- https://yoururlhere.freshservice.com/api/v2/{insert_endpoint}.Be sure to replace "yoururlhere" with your actual Freshservice domain name.
- Some endpoints may include things like ?include=type_fields to expand upon the information that is displayed.
For more Freshservice Tips and Tricks videos, click here.

For more information about our Freshservice Professional Services, click here.
